Performance Testing with Jmeter
Posted By : Nitin Kumar | 25-Jan-2018
Performance testing using JMeter
Performance testing, As its name, suggests “Testing which is done to check the performance of an application. Performance testing is very important for any application.It play a very crucial role in satisfying the client need after the functionality of the application.Performance testing is very much crucial to determine that how the application will react to load condition. It is actually performed to estimate or identify the overall performance of an application under heavy load.

It is very difficult to do the performance testing manually.A lot of things is to be tested like test the throughput of application etc.Many automation tools are provided for performance testing and in this blog, I will describe some basics of performance testing using JMeter.
Jmeter is an open source testing software.It is a pure java application to perform the category of testing like load testing, performance testing, functional testing and regression testing.For using JMeter it important to have the basic knowledge of java.
The JMeter testing tool provides these benefits in performance testing:
1.It is used to test the performance of both static and dynamic resources like javascript, CSS, and jsp , servlet respectively.
2.It is also used to identify the maximum number of user concurrently can be handled by your website or application.
3.Jmeter provides the different graphical way to report the performance.
Jmeter performance testing includes:
1.Load testing
2.Performance testing
1.Load testing: In this type of testing, it is to test that how many user concurrently can be handled by your application at a time.
2.Stress testing: In this type of testing , testing is done to check how the application will react when load applied to the application goes beyond the limit.
Create the performance test plan in jmeter:
1.Add thread group
2.Add Jmeter element
3.Add graph result
4.Run test get result
1.Add thread group
a) Start Jmeter
b) Select test plan
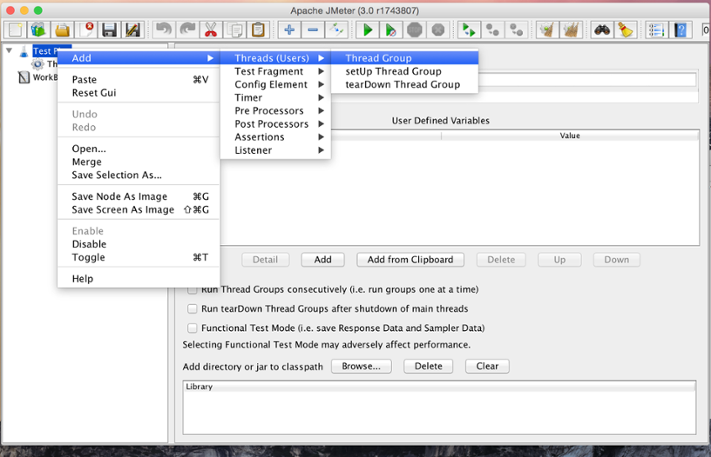
c) Add thread group
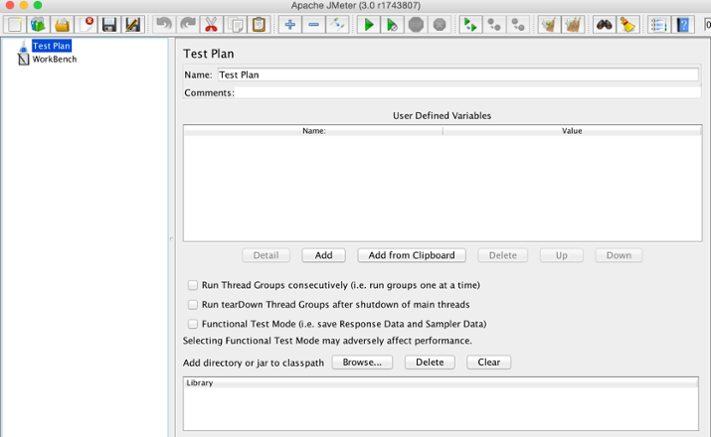
Right click on thread plan and create a new thread group.
In thread group control panel,you have to enter the thread properties.
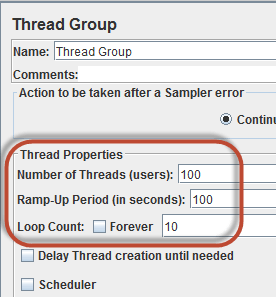
1.Number of thread: Number of user concurrently target the website.
2.Ramp up period: Ramp up period tells the jmeter about how much time it will take to execute full execution.
3.Loop count: Number of time to execute testing.
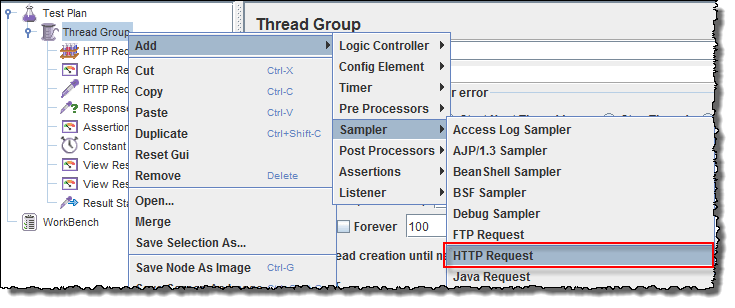
2.Adding jmeter jmeter element.

In Http Request Default enter the website name which you want to test.
Http Request:Enter the URL you want to send to google server.
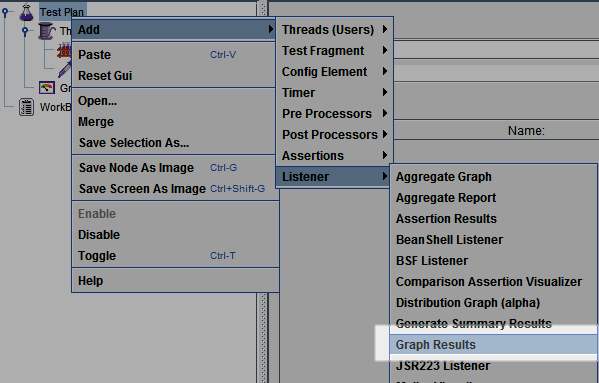
3.Adding graph result:
Means how you want your result to be display.
a)Add lister
b)In listener select graph result.
4.Run test and get the result.
Software testing will start on clicking on run button and you can see the graph result.

There are many other option also provided in Jmeter.
Cookies are important to the proper functioning of a site. To improve your experience, we use cookies to remember log-in details and provide secure log-in, collect statistics to optimize site functionality, and deliver content tailored to your interests. Click Agree and Proceed to accept cookies and go directly to the site or click on View Cookie Settings to see detailed descriptions of the types of cookies and choose whether to accept certain cookies while on the site.


About Author
Nitin Kumar
Nitin is a QA Engineer. He is adaptive and passionate to learn new technical skills.